
Epoxy flooring has grown in popularity over the years due to its durability, versatility, and sleek finish. However, like any flooring material, it has its advantages and disadvantages. Below, we will explore the major pros and cons of epoxy flooring to help you decide if it’s the right choice for your space.
Pros of Epoxy Flooring
- Epoxy floors are highly resistant to wear and tear, making them ideal for high-traffic areas in both residential and commercial settings.
- They can withstand impacts from heavy machinery or furniture without cracking or chipping.
- The seamless surface makes epoxy floors easy to clean. Dust, dirt, or spills can be wiped away effortlessly with a mop or cloth.
- The non-porous nature prevents stains from penetrating the surface.
- Compared to materials like hardwood, tiles, or polished concrete, epoxy offers an economical flooring solution while still delivering a professional look.
- Epoxy comes in a variety of colors and finishes—metallics, flakes, matte coatings—allowing homeowners and businesses to customize their floors to match their style.
- It is highly resistant to chemicals such as oils, solvents, cleaning agents, making it an excellent choice for industrial spaces or garages where chemical spills are more common.
- The uniform finish provides a smooth appearance that eliminates cracks where dirt can accumulate—a practical feature especially in hospitals or kitchens where hygiene is essential.
Cons of Epoxy Flooring
- Preparing the substrate before applying epoxy involves extensive cleaning and repair work. Additionally, curing times may take days depending on the specific product used.
- When wet or coated with oil spills, epoxy floors can become slippery unless special non-slip additives are applied during installation.
- While durable compared to many other floor types, epoxy does not last forever; reapplication may be required every 5–10 years depending on usage conditions.
- Although strong under most circumstances, extreme impacts or movements in the substrate (like concrete cracks) can lead to fractures in the epoxy layer over time.
- Prolonged exposure to sunlight can cause epoxy’s color to fade over time unless UV-stable formulations are used during application.
- Uncured epoxy emits strong fumes that may require proper ventilation during installation as they could pose health risks if inhaled excessively.
Table: Quick Comparison of Pros and Cons
| Pros | Cons |
| Highly durable | Lengthy installation process |
| Easy maintenance | Can become slippery when wet |
| Aesthetically versatile | Needs reapplication after several years |
| Resists chemicals | Susceptible to cracking under stress |
| Cost-effective | Fades with UV exposure unless treated |
Epoxy flooring offers a balance between functionality and aesthetics that appeals widely across industries as well as residential contexts like garages or kitchens; understanding these pros and cons will help guide your selection process effectively based on your unique needs.
Clearwater Epoxy Garage Flooring for Durability and Long-Lasting Performance
Epoxy flooring is widely recognized for its exceptional durability and long-lasting performance, making it a popular choice for both residential and commercial spaces. Its robust nature stems from the chemical bond formed between the resin and hardener during the curing process, resulting in a solid, seamless surface that can withstand substantial wear and tear.
Expert Tips from Epoxy Flooring Installers Clearwater FL for Long-Lasting Floors
- Epoxy floors are highly resistant to heavy impacts, which makes them ideal for environments with high foot traffic or heavy machinery such as warehouses, factories, and garages.
- This impact resistance significantly reduces the likelihood of cracks or dents even in challenging conditions.
- One of the most noteworthy qualities of epoxy flooring is its ability to resist various chemicals such as oils, acids, solvents, and other corrosive substances.
- This feature ensures longevity in industrial settings where chemical spills are common.
- The hardened surface of epoxy floors provides excellent protection against scratches caused by dragging furniture or equipment across them.
- This quality makes epoxy a low-maintenance option compared to other flooring types like wood or tile.
- Epoxy creates a non-porous barrier that prevents moisture from seeping in, mitigating risks of warping or mold growth.
- It is particularly suitable for basements and other areas prone to high humidity levels.
Lifespan of Epoxy Floors
- Frequency of heavy impacts or abrasions
- Exposure to direct sunlight (UV radiation)
- Quality of installation materials used
Maintenance Tips for Prolonging Durability
- Sweep daily to remove dirt or debris that could cause scratches over time.
- Mop periodically using mild soap and water; avoid harsh cleaning chemicals that could degrade the finish.
- Place mats at entry points to minimize dirt tracking onto the surface.
- Address spills promptly—especially abrasive substances—to prevent any potential damage.
| Maintenance Task | Frequency | Purpose |
| Sweeping | Daily | Removes dirt/debris that may scratch |
| Mopping | Weekly/As Needed | Keeps surface clean & shiny |
| Inspecting | Monthly | Identifies early signs of damage |
Factors That May Affect Durability
- Improper Installation: Poor preparation of the substrate (e.g., uncleaned concrete) can reduce adhesion strength leading to peeling or cracking over time.
- UV Exposure: Direct sunlight exposure can cause discoloration or fading if UV-resistant coatings aren’t applied.
- Excessive Weight Loads: Although robust, continued exposure to extreme weight without reinforcement may lead to tiny fractures over prolonged periods.
Epoxy flooring’s reputation for durability is well-earned due to its resistance against physical impacts, chemicals, moisture intrusion, and abrasion when installed correctly and maintained appropriately—making it one of the most reliable surfaces available today across different industries and spaces alike.
How Epoxy Flooring Enhances Aesthetic Versatility in Your Space
Epoxy flooring is widely recognized not only for its durability but also for its ability to enhance the aesthetic appeal of both residential and commercial spaces. Its versatile nature allows property owners to customize flooring designs, patterns, textures, and finishes to suit their specific needs. Below, we explore how epoxy flooring can elevate the appearance of your interiors.
Customizable Colors and Patterns
Epoxy offers an extensive range of color options that can complement virtually any design theme. Whether you prefer bold, vibrant tones or subtle, neutral hues, epoxy can be tailored to match your space’s aesthetic vision.
Key benefits of customizable colors and patterns include: – Monochromatic Floors: Perfect for minimalist settings, providing a clean and sleek look. – Metallic Finishes: Add a sense of luxury with metallic pigments that create a shimmering effect. – Flake Systems: Use decorative flakes in various colors to create texture and hide imperfections. – Abstract Designs: Swirls, gradients, or custom artistic patterns can add uniqueness to your interiors.
High-Gloss or Matte Finishes
One significant advantage of epoxy flooring is the availability of different finish options: – High-gloss finishes: These reflect light efficiently, making spaces appear brighter and more spacious. This feature works well in showrooms or retail spaces where lighting is crucial. – Matte finishes: Provide a subdued yet elegant look ideal for office environments or modern residential designs.
The choice between gloss and matte ensures adaptability to diverse stylistic preferences.
Seamless Appearance
The seamless quality of epoxy floors enhances their visual appeal by creating a continuous surface free from grout lines or gaps. This characteristic not only improves the aesthetics but also contributes to easier maintenance. Seamless surfaces are especially beneficial in areas like kitchens or healthcare facilities where cleanliness is paramount.
Imitation of High-End Materials
Epoxy flooring can mimic premium materials such as marble or granite at a fraction of the cost. By using specialized techniques during application, installers can replicate intricate veining patterns found in natural stone without compromising on affordability or durability.
| Material | Epoxy Replication Options | Cost Comparison |
| Marble | Veined metallic finishes | Significantly lower than real marble |
| Granite | Flake system textures | Lower cost with similar impact |
| Terrazzo | Colored chips replicated | More budget-friendly |
This versatility makes epoxy an accessible option for achieving luxurious aesthetics on a budget.
Integration with Branding and Themes
For commercial spaces such as retail stores or corporate offices, epoxy floors can incorporate branding elements seamlessly: – Custom logos embedded into the surface. – Color schemes aligned with brand identity. – Thematic designs that reflect company values or cultural elements.
This customization allows businesses to enhance their overall visual presentation while maintaining functional floor solutions.
Final Thoughts on Aesthetic Versatility
The adaptability of epoxy flooring makes it an exceptional choice for those looking to enhance visual appeal without sacrificing functionality. With endless design possibilities—ranging from custom colors and luxurious textures to seamless surfaces—epoxy provides an ideal balance between style and practicality. When installed professionally, it becomes a transformative element that elevates any space’s ambiance while maintaining its longevity over time.
Why Epoxy Flooring is an Ideal Choice for Garages and Workshops
Epoxy flooring is a popular solution for garages and workshops due to its durability, resilience, and ability to withstand the demanding conditions of these spaces. Whether used in residential or commercial settings, epoxy offers a combination of functionality and aesthetics that make it a reliable flooring option. Below, we explore the key reasons why epoxy flooring stands out as an ideal choice for garages and workshops.
Superior Durability for High-Traffic Areas
- Impact Resistance: Epoxy can withstand the drop of heavy tools without cracking or chipping.
- Load-Bearing Capacity: It supports the weight of vehicles, machinery, and equipment with ease.
- Scratch and Abrasion Resistance: Its tough surface minimizes scratches from dragging objects like metal toolboxes.
Chemical Resistance
In garages and workshops where exposure to chemicals such as oil, grease, gasoline, and cleaning agents is common, epoxy flooring provides excellent resistance against chemical spills. This feature prevents staining and degradation while maintaining its structural integrity over time.
Key Chemical-Resistant Properties:
| Spill Type | Resistance Level |
| Automotive Fluids | High |
| Solvents | High |
| Cleaning Chemicals | High |
This resistance helps keep your floor looking clean while reducing maintenance needs.
Easy Maintenance
- Regular sweeping removes dust accumulation.
- Spills can be cleaned with a damp mop or mild detergent.
- There’s no need for waxing or polishing.
This low-maintenance requirement is particularly advantageous in busy spaces like workshops where time management is critical.
Slip Resistance Options
- Aluminum oxide
- Silica sand
- Polymer grit
These options make epoxy suitable even in environments prone to spills or moisture buildup.
Enhanced Aesthetics
- Color Choices: Select from solid colors that match your space’s theme.
- Metallic Finishes: Add a touch of elegance with reflective finishes.
- Flake Systems: Incorporate decorative flakes for texture and visual interest.
These design variations ensure that garages can look polished while remaining practical.
Long-Term Cost Efficiency
While the upfront cost of installing epoxy may be higher compared to traditional concrete sealants or paints, its long lifespan ensures lower long-term expenses. Its durability reduces the need for frequent repairs or replacements—an important consideration in high-use areas like garages or commercial workshops.
Epoxy flooring combines robustness with customization options tailored specifically for challenging environments such as garages and workshops. Its durability under stress conditions and resistance to damage make it an economical choice that delivers value over years of use.

Installing Epoxy Over Existing Tiles: What You Need to Know
Installing epoxy over existing tiles can be an effective way to revamp your flooring without the need for costly and time-consuming tile removal. However, this process requires careful preparation and adherence to specific steps to ensure a durable and visually appealing finish.
Benefits of Applying Epoxy Over Existing Tiles
- Cost Efficiency: Avoiding tile removal saves on labor and disposal costs.
- Time-Saving: Eliminating demolition reduces project timelines drastically.
- Durability: Epoxy provides a strong, long-lasting surface that resists wear and tear.
- Customizable Design: It offers a variety of finishes, colors, and textures that can transform outdated tiled floors into modern surfaces.
Challenges to Consider
- Grout lines or irregularities on the tiles can lead to an uneven epoxy application if not properly leveled.
- Some tile materials, such as glazed ceramics, may pose adhesion problems without proper surface preparation.
- If moisture is trapped beneath the existing tiles or within porous grout lines, it can cause the epoxy to delaminate over time.
Key Steps for Successful Installation
- Clean the existing tiles thoroughly to remove dirt, grease, and any contaminants.
- Use a degreaser or specialized cleaning agent for stubborn stains.
- Sand or grind the tile surface lightly to create texture for better adhesion.
- Fill grout lines with an appropriate leveling compound or self-leveling underlayment.
- Ensure a smooth and even surface before applying the epoxy coating.
- Apply a high-quality primer designed to adhere specifically to tile surfaces. This step enhances bonding between the tiles and epoxy coating.
- Mix the epoxy resin with hardener as per manufacturer guidelines.
- Pour and spread evenly using a squeegee or roller while ensuring proper thickness.
- Allow sufficient curing time as specified by the product instructions. Avoid foot traffic during this period for optimal results.
Comparison Table: Tile Removal vs. Epoxy Over Tiles
| Factor | Tile Removal | Epoxy Over Tiles |
| Cost | High (labor/material disposal) | Lower |
| Time | Longer (demolition & reinstallation) | Shorter |
| Surface Longevity | Dependent on new material chosen | Durable with proper installation |
| Complexity | Medium | Higher due to preparation needs |
Tips for Best Results
- Always consult with professionals if you are unsure about adhesive compatibility or potential moisture concerns in your space.
- Conduct a patch test on a small area of tile before committing fully to ensure proper adhesion results.
- Follow product specifications closely during mixing, application, and curing stages.
Epoxy coatings offer excellent opportunities for transforming tiled spaces when installed correctly over existing surfaces.
Expert Tips from an Epoxy Flooring Company in Clearwater FL on Installation
The installation process of epoxy floors is a multi-step and meticulous procedure that requires careful planning and execution. Whether you are applying it in a residential space, commercial environment, or an industrial facility, understanding each phase of the process is crucial to achieving a durable and visually appealing finish. Below is an in-depth guide to the key steps involved in epoxy floor installation.
Preparation of the Substrate
Proper substrate preparation is one of the most critical aspects of installing epoxy flooring. A poorly prepared surface can lead to adhesion issues, delamination, or uneven finishes.
- Cleaning: The surface must be free from dust, dirt, oil, grease, or any contaminants.
- Repairs: Cracks, chips, or imperfections in the substrate should be filled using appropriate patching materials.
- Moisture Testing: Moisture levels should be checked with tools like moisture meters since excess moisture can prevent proper adhesion.
- Surface Profiling: Mechanical abrasion methods such as shot blasting or diamond grinding are often used to create a textured surface for better adhesion.
| Surface Preparation Checklist | Importance |
| Clean and remove debris | Ensures proper bonding |
| Fill cracks and imperfections | Prevents weak points |
| Test for moisture | Avoids delamination due to trapped water |
| Abrade surface | Enhances epoxy adherence by creating roughness |
Application of Primer
Primers play an essential role in ensuring strong adhesion between the substrate and the epoxy coating. The primer also helps seal porous surfaces and reduces bubble formation during application.
- Mix the primer components as per manufacturer instructions.
- Use rollers or brushes to evenly apply the primer across the prepared surface.
- Allow sufficient curing time before moving on to subsequent layers.
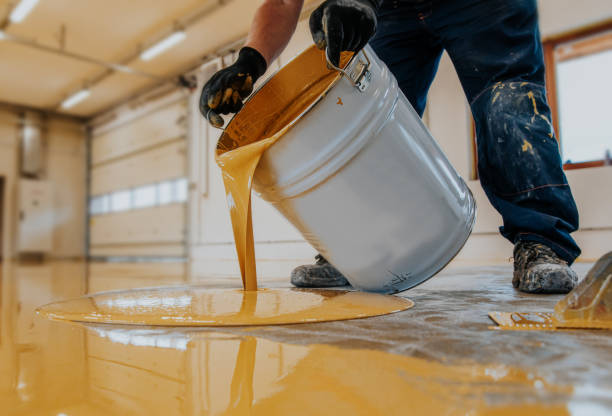
Mixing Epoxy Resin Properly
Mixing epoxy resin requires precision because improper ratios can compromise performance and longevity. Most epoxies consist of two parts – resin (Part A) and hardener (Part B). These components need to be mixed thoroughly according to manufacturer guidelines.
- Use clean containers free from contaminants.
- Employ mechanical mixers for consistency.
- Avoid over-mixing as it may trap air bubbles.
Pro Tip: Always mix small batches if you’re new to handling epoxy resin; this prevents wastage caused by premature curing.
Application of Base Coat
The base coat forms the foundational layer for your epoxy floor system. This layer contributes significantly to overall durability and appearance.
- Pour mixed epoxy onto the primed surface.
- Spread it evenly using squeegees followed by backrolling with high-quality rollers.
- Ensure uniform coverage without pooling or thin spots.
Adding Decorative Elements (Optional)
For spaces requiring aesthetic appeal (like showrooms or living areas), decorative elements such as flakes, quartz aggregates, or metallic pigments can be added after applying the base coat while it’s still wet.
Popular Decorative Options:
- Colored flakes for texture and color variety
- Metallic pigments for a glossy marble-like effect
- Quartz sand aggregates for slip resistance
Topcoat Application
The topcoat is essential for sealing decorative layers (if applied) and providing additional protection against wear and tear. It enhances resistance against chemicals, stains, UV rays (for UV-stable formulations), and scratches.
Steps include: 1. Mix topcoat materials thoroughly. 2. Apply uniformly over dried base coats/decorative layers using rollers or brushes. 3. Allow adequate curing time per product specifications before subjecting it to foot traffic or heavy loads.
| Coating Layer | Role |
| Primer | Adhesion enhancer |
| Base Coat | Structural foundation |
| Decorative Layer | Aesthetic customizations |
| Topcoat | Protective barrier against environmental factors |
Curing Process
Curing times vary depending on factors like product formulation, ambient temperature, humidity levels, etc., but typically range between 24–72 hours before light use is permitted. Full curing may take up to 7 days depending on environmental conditions.
Factors Impacting Curing Time:
- Temperature: Optimum range is generally 60°F–85°F (15°C–30°C).
- Humidity: High humidity may slow down curing rates.
Ensure no heavy objects are placed on newly installed floors until they’ve fully cured.
Epoxy floor installation demands attention at every step — from meticulous preparation through precise application techniques — ensuring both functionality and aesthetics align with expectations when performed correctly
Addressing Common Issues: Susceptibility to UV Damage and Delamination in Epoxy Floors
Epoxy flooring is widely recognized for its durability and aesthetic appeal. However, understanding the potential challenges associated with epoxy floors, such as susceptibility to UV damage and delamination, is crucial for ensuring long-term performance. This section explores these common issues and provides actionable solutions to mitigate them.
UV Damage in Epoxy Floors
- Yellowing or discoloration: Direct sunlight often causes epoxy surfaces to turn yellow or lose their vibrant color.
- Loss of gloss: Over time, UV exposure can dull the glossy finish of epoxy flooring.
- Cracking or brittleness: Intense sunlight may weaken the epoxy layers, increasing the likelihood of surface cracks.
Preventative Measures
- Applying a polyurethane or polyaspartic topcoat designed for UV resistance can protect epoxy surfaces from sun exposure.
- These coatings act as an additional layer, shielding against discoloration while preserving the floor’s finish.
- Use epoxy flooring in spaces with limited natural light or where UV exposure is negligible (e.g., basements, workshops).
- Installing window films, blinds, or curtains can reduce direct sunlight hitting your floors.
- Opting for pigmented epoxies instead of clear coatings can minimize visible yellowing caused by UV light.
Delamination in Epoxy Floors
Delamination occurs when the bond between the epoxy coating and the substrate weakens or fails entirely. This issue often manifests as peeling, bubbling, or lifting of sections of flooring.
Causes of Delamination
- Moisture intrusion: Excess moisture trapped in the substrate during installation can lead to poor adhesion.
- Improper surface preparation: Failure to clean and abrade the substrate adequately can hinder bonding.
- Substrate movement: Concrete shifting due to temperature variations or structural settling could disrupt adhesion over time.
- Low-quality materials: Using subpar epoxy products that lack sufficient adhesion properties increases vulnerability to delamination.
Preventative Measures
- Clean away dust, oil stains, and debris before applying epoxy.
- Mechanically abrade surfaces using diamond grinders or shot blasters for optimal bonding conditions.
- Perform tests like calcium chloride tests or relative humidity tests to detect excess moisture in concrete slabs before application.
- Apply a moisture barrier primer if necessary.
- Invest in reputable brands that offer durable products with strong adhesive properties suited for your specific environment.
- Conduct installations within recommended temperature ranges specified by manufacturers.
| Common Issue | Prevention Strategy |
| Yellowing/Discoloration | Use UV-resistant topcoats; reduce direct sunlight |
| Loss of Gloss | Apply protective coatings; limit outdoor applications |
| Cracking/Brittleness | Avoid prolonged sun exposure; use quality materials |
| Peeling/Delamination | Ensure proper prep; test for moisture before installation |
Recognizing these challenges enables property owners and installers to take proactive measures that improve both functionality and appearance over time while minimizing maintenance needs.
- Top Reasons to Hire an Epoxy Garage Flooring Contractor Clearwater FL
- Key Benefits of Hiring an Epoxy Flooring Company Clearwater FL for Your Garage Flooring
- Pros and Cons of Hiring an Epoxy Garage Flooring Contractor Clearwater FL
- Transform Your Garage with an Epoxy Garage Flooring Contractor in Clearwater FL for a Durable and Stylish Finish
- Tips for Choosing the Right Epoxy Flooring Company Clearwater FL for Your Project
- Epoxy Garage Flooring Contractor Clearwater FL: Transform Your Garage Into a Stunning Showroom
- Why You Should Choose an Epoxy Flooring Company Clearwater FL for Your Garage Floors